PostgreSQL’s streaming replication feature has been around for a few years now. It can be used to setup replicated PostgreSQL cluster configurations in different ways, for different uses. Read on to find out how easy and versatile this feature is!
A Little Theory
The basis of streaming replication is the ability to ship and apply Write Ahead Logs, or WALs.
WALs are used in nearly all modern RDBMS systems to provide durable and atomic transactions. Simply put, any transaction performed on the database is first written out as a WAL file, then applied to the actual on-disk table data files. WAL files are strictly sequential. This makes the WAL file sequence a “replay log” of changes.
This implies that if you need to replicate all the changes happening on one database node, all you have to do is to copy over the WAL files as they are being created, and apply them in sequence on another node. Doing this will get you another database node with contents identical to the original one. In other words, you can get a slave node.
So how do we copy the WAL files? They are literally files that need to be copied from one machine to another, so you can either set up scripts that will do it, or use the streaming replication feature to connect and pull the files from the master.
What if I copy the files to multiple nodes? You end up with two (or more) identical slaves, each replicating from the same master. That’s a valid and useful scenario.
Can I modify the data at the slaves? You can’t. The replication that we’ve described here is unidirectional – you can get the WALs from a master node to a slave node, but not vice versa. Streaming replication does not support bidirectional, or multi-master replication setups. Other 3rd party solutions exist that can help you with this.
Can I read the data from the slaves? Yes. The slave is then called a “hot standby”. Such setups are commonly used for running analytic workloads without increasing the load on a live master.
I want real-time replication to other nodes. No problem. Slave nodes can be “synchronous”. The master, when asked to commit a transaction, will wait until all the synchronous slaves have finished pulling the WAL files for that transaction (and written it out to disk). If you’re familiar with MongoDB, this is similar to a “write concern” of more than 1.
Won’t the WAL files keep piling up? They will, if you don’t tell Postgres
when to clean up. You can limit these files by number and/or total size. The
master obviously needs to hang on to them until all slaves pick them up.
Individual WAL files are of a fixed 16 MB size, and live under
$PGDATA/pg_xlog.
Basic Replication
If you’re feeling overwhelmed, try setting up a slave to see how easy it is! We’ll assume that you have a running PostgreSQL installation on the IP 10.0.0.10 and that you’re setting up a slave at 10.0.0.11, with both running PostgreSQL 9.5.4.
Master Setup
First, have a look at the master’s settings (postgresql.conf) and update them
if needed (and restart the server for changes to take effect):
# The WAL level should be hot_standby or logical.
wal_level = hot_standby

# Allow up to 8 standbys and backup processes to connect at a time.
max_wal_senders = 8

# Retain 1GB worth of WAL files. Adjust this depending on your transaction rate.
max_wal_size = 1GB
Next, we need to create a user. This streaming replication client in the slave node will connect to the master as this user.
$ sudo -u postgres psql
psql (9.5.4)
Type "help" for help.

postgres=# create user repluser replication;
CREATE ROLE
postgres=# \q
In pg_hba.conf, allow this user to connect for replication.
# TYPE  DATABASE        USER            ADDRESS                 METHOD
host    replication     repluser        10.0.0.11/32            trust
The user repluser is a regular Postgres user, so feel free to use your
standard authentication practices. Remember to reload (sudo systemctl reload postgresql) for changes to take
effect.
Slave Setup
We need to initialize the slave with a backup of the master’s databases. We’ll do this directly from the slave. Note that this process will wipe all the data on the slave.
First, let’s stop the slave:
$ sudo systemctl stop postgresqlNext, we’ll take the backup:
$ pg_basebackup -h 10.0.0.10 -U repluser -Ft -x -D - > /tmp/backup.tarThis will connect to the master as the user we just created, and take a backup
of the master’s databases and write it to /tmp/backup.tar. Now let’s restore
this:
$ export DATADIR=/var/lib/postgresql/9.5/main
$ sudo rm -rf $DATADIR/*
$ sudo -u postgres tar x -v -C $DATADIR -f /tmp/backup.tar
$ rm /tmp/backup.tar
We need to create a file called recovery.conf in the data directory of the
slave. This will tell the slave how to connect to the master.
$ sudo tee $DATADIR/recovery.conf <<EOR
# This tells the slave to keep pulling WALs from master.
standby_mode = on

# This is how to connect to the master.
primary_conninfo = 'host=10.0.0.10 user=repluser'
EOR
$ sudo chown postgres:postgres $DATADIR/recovery.conf
And finally, we’ll enable the slave to serve as a read replica. To do this,
enable hot_standby in postgresql.conf:
hot_standby = onNow we’re ready to start the slave:
$ sudo systemctl start postgresqlThe slave should startup, init the streaming replication and get into hot standby
mode. There should be log entries similar to this, in
the log file /var/log/postgresql/postgresql-9.5-main.log:
[25471-2] LOG:  entering standby mode
[25471-3] LOG:  redo starts at 0/3000760
[25471-4] LOG:  consistent recovery state reached at 0/3000840
[25471-5] LOG:  invalid record length at 0/3000840
[25470-1] LOG:  database system is ready to accept read only connections
[25475-1] LOG:  started streaming WAL from primary at 0/3000000 on timeline 1
Congratulations! You have now setup a slave node that uses streaming replication to stay in sync with the master.
Here is how the slave behaves when you try to make changes:
postgres=# select pg_is_in_recovery();
 pg_is_in_recovery
-------------------
 t
(1 row)

postgres=# create database testme;
ERROR: cannot execute CREATE DATABASE in a read-only transactionMultiple Slaves
You can repeat the steps for the slave setup on another node, to bring up
another slave. Ensure that max_wal_senders is high enough to accomodate
all the slaves and the occasional backup or administrative process that
connects to the master.
Synchronous Replication
To enable synchronous replication with one more more standby’s, first ensure
that each standby has a name. You can specify the name as application_name
in the primary_conninfo parameter in the standby’s recovery.conf, like this:
# In the file /var/lib/postgresql/9.5/main/recovery.conf, include the
# application name in the primary_conninfo:

primary_conninfo = 'host=10.0.0.10 user=repluser application_name=pluto'
Once each standby has a name that the master can refer to, you can edit the
master’s postgresql.conf:
# Wait for standbys to finish writing out WALs to disk, before returning from
# the commit.
synchronous_commit = remote_write

# These are the standbys that need to acknowledge the write. You can also use
# '*' to indicate all the standbys.
synchronous_standby_names = 'pluto'
Naturally, synchronous commits take more time to complete, but provide increased safety against crashes of the master server.
Cascading Replication
Rather than replicating two slaves off the same master, you can replicate one slave off another. This is usually called “cascading replication”.
A hot standby can serve as a master itself, and permit replicating off it.
Nothing extra needs to be configured, other than the master settings like
max_wal_senders and pg_hba.conf authentication.
Cascading replication is always asynchronous.
Slave Promotion
Slaves can be promoted to be a master. This can be done by running the command:
$ sudo pg_ctlcluster 9.5 main promoteYou can also specify a file name (called a “trigger file”) in recovery.conf:
# In the file /var/lib/postgresql/9.5/main/recovery.conf, include a
# trigger file name:

trigger_file = '/tmp/pg-trigger-failover-now'
Postgres will do a failover and promote the slave if it finds that this file has been created.
After a failover, the recovery.conf file will be renamed to recovery.done.
The contents of the file will not be read and considered by Postgres after that.
Before attempting the failover, ensure that the slave node has an identical configuration (including pb_hba.conf with the proper IPs) to the existing master. Also, after a successful failover, the old master should be taken out of service (“shoot the other node in the head”). Applications should not attempt to talk to the retired master.
Monitoring
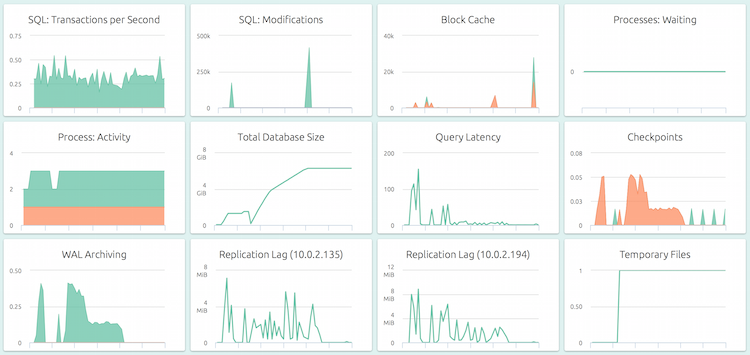
With OpsDash, you can quickly start monitoring your PostgreSQL servers, and get instant insight into key performance and health metrics including WAL archiving and streaming replication.
OpsDash strives to save you the tedious work of setting up a useful dashboard. The metrics you see here were carefully chosen to represent the most relevant health and performance indicators for a typical PostgreSQL instance.
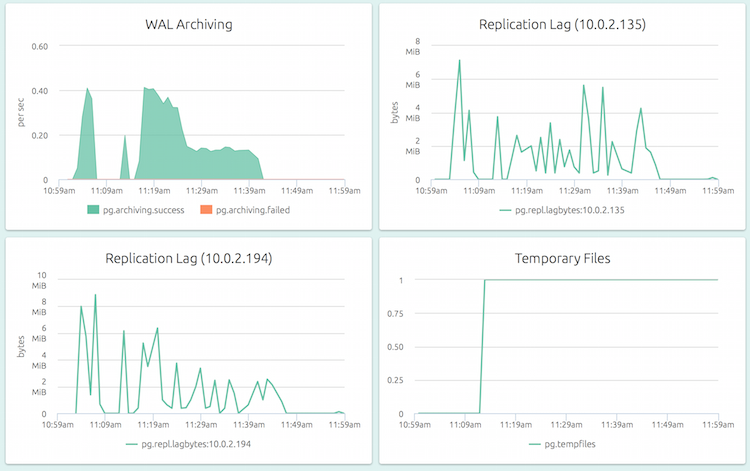
OpsDash understands the streaming replication feature of PostgreSQL and displays per-slave replication status on the master:
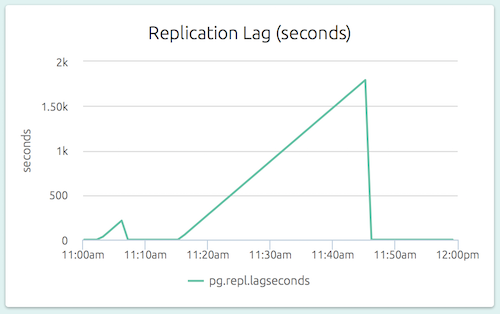
The replication lag (as a length of time) is also visible on a slave’s dashboard. In the graph below (part of the dashboard of a slave), we can see that the slave could not catch up to the master’s changes for a while.
By comparing the replication lag at master side (was the master able to ship the WALs in time?) and the slave side (was the slave able to apply the incoming WALs in time?), it is easy to identify the replication bottleneck.
Adding a threshold-based alert to the replication lag metric on a slave is a quick and easy way to catch a lagging slave before it gets out of control.
Further Reading
The relevant chapter in the PostgreSQL documentation is the best place to start digging further. The Wiki page also has more links and tips.
There are also further feedback mechanisms between a slave and a master that we didn’t cover here. These include replication slots and other config options.
This page has a good overview of other replication solutions.
Have more tips? Feel free to leave a comment below!
New Here?
OpsDash is a server monitoring, service monitoring, and database monitoring solution for monitoring MySQL, PostgreSQL, MongoDB, memcache, Redis, Apache, Nginx, Elasticsearch and more. It provides intelligent, customizable dashboards and spam-free alerting via email, HipChat, Slack, PagerDuty and Webhooks. Send in your custom metrics with StatsD and Graphite interfaces built into each agent.


